How Flex Fuel Control Works
In this article, we are taking a closer look at Flex Fuel Sensors. Topics covered are: what flex fuel sensors are, how they work, when you might need one and how to install and set one up on a Haltech ECU.
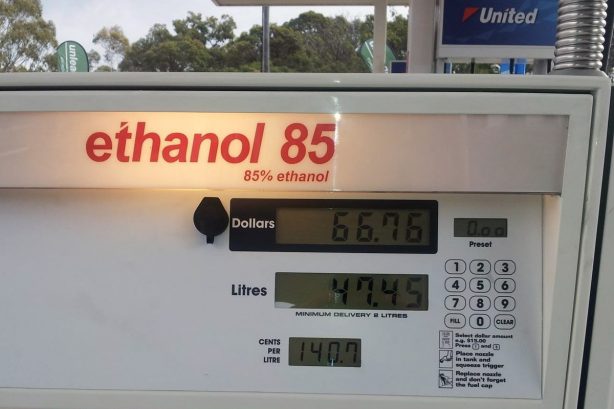
It’s no secret ethanol based fuels are becoming more and more popular with performance enthusiasts and for good reason. Ethanol has a high octane rating, it’s affordable, it’s renewable and it’s clean-burning.
How Flex Fuel Works
On a high performance engine, burning ethanol as a fuel often allows us to run higher compression ratios, add more boost and increase ignition timing – all of which can help us achieve our ultimate goal of making more horsepower safely and turning on the WIN light at the end of the track.
What is ethanol and how is it different from gasoline as a fuel?
The chemical composition of ethanol is quite different to that of gasoline-based fuels. As a result of this, the volume of fuel required by an engine running on ethanol is about 35% greater than that of regular gasoline.
This presents a bit of a problem because we have this new, clean, safe, powerful fuel available to us as performance enthusiasts, but it requires the fuel delivery system to be re-calibrated to deliver roughly 35% more fuel for it to work properly.
In the carburettor days that would have been a big issue because it would require re-jetting the carb completely for this fuel type, and, once that was done we couldn’t go back to gasoline without re-jetting the carb again.
With EFI however, we can use a flex fuel sensor which, when installed into the fuel line, can measure the actual percentage content of ethanol in the fuel.
For example: if you had half a tank of gasoline and you topped the tank up with 100% ethanol then mixed it all around, you would end up with a mixture of 50% ethanol/50% gasoline.
The sensor would then read this 50/50 mix and feed that information into the ECU which can, in turn, be tuned to deliver precisely the right amount of fuel for that particular mixture of gasoline and ethanol in the fuel line. Or in carb speak, it’s like re-jetting the carb continually based on the amount of ethanol in the fuel.
Installing the sensor
Typically we install the flex fuel sensor in the fuel return line as shown in the diagram below. There are some of the limitations of installing it this way and we’ll get back to that later but for now, let’s just agree this is the simplest and most practical place to install your flex fuel sensor.
Following the wiring guide that comes with the sensor, we wire up +12V, signal and sensor ground to the ECU wiring harness. Because flex fuel sensors are a frequency based input, this sensor needs to be wired into a digital pulsed input or DPIs on the ECU.
Software Setup
With the sensor installed let’s take a look at how to setup your Haltech ECU to read and use a flex fuel sensor.
The first thing to do is to go into the SETUP menu and click on MAIN SETUP. Go into the FUNCTIONS tab. The easiest way to navigate this page is to go to the SEARCH bar at the bottom and simply type “flex”.
Notice there are 2 types of flex fuel sensors commonly available. Haltech’s sensor allows you to read both ethanol content and fuel temperature from the same sensor so we click on the “Flex Fuel/Composition Sensor”.
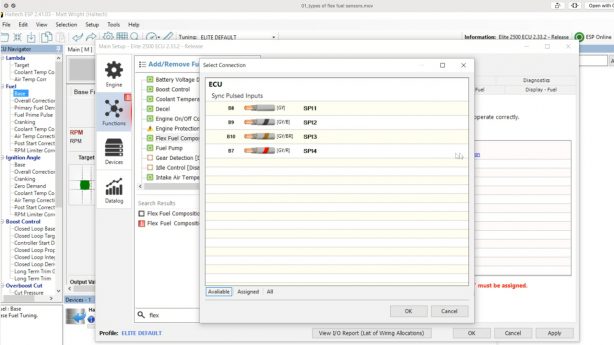
When we enable this function we can see that the software prompts us to select an input we are going to wire the sensor to. In this case we have SPIs 1-4 available. Select one of these to let the ECU know which wire to look for the flex fuel signal on.
To use both the Ethanol Content and Fuel Temperature functions we will need to select the EDGE to rising.
Next, load the latest sensor calibration for both temperature and ethanol content by clicking on the LOAD CALIBRATION tab (that’s the one that looks like a folder).
Starting with the ethanol content calibration, select the “Fuel Composition Digital – Haltech” calibration.
Next, for temperature scroll down to the calibration named “Temperature_Digitalfuelcomposition – Haltech” and select it.
And that’s it. Your Haltech flex fuel sensor is setup and ready to use!
Setting Sampling Threshold
Remember how we said earlier that the best place to install a flex fuel sensor is in the fuel return line? While this is true in most cases, sometimes in high performance applications we might run into a problem of pushing the limits of the fuel pump to supply enough fuel.
When that happens, there is no fuel in the return line which can give some really strange readings on a flex fuel sensor.
That’s where Sampling Threshold settings can be used. Working on the theory that once the fuel is in the tank and the engine has run for a minute or two, the ethanol content is fairly consistent until it's refilled again, we can tell the ECU to stop sampling ethanol content above a predefined load and RPM to prevent incorrect sensor readings caused by lack of fuel flow through the return line.
Setting Fuel and Ignition tables
Once the sensor has been setup in the MAIN SET UP page, we are ready to start working with the fuel and ignition calibrations to ensure that the ECU delivers the desired amount of fuel for the actual content of ethanol in the tank.
The simplest way of achieving this is to go into the MAIN SET UP window and click on the FUEL tab, here we can select the fuel type – select “Flex Fuel”.
This tells the ECU to look at the flex fuel sensor and automatically calculate the additional fuel required to provide the engine to meet the target air/fuel ratio.
This is where it gets interesting…
We know from the chemistry of the fuel type what the chemically and mathematically correct amount of additional fuel we need to add, but what we find in the real world is that by just adding the mathematically correct amount of additional fuel to the engine, the actual air fuel ratio as measured from the Lambda sensor in the exhaust is often out by a couple of percent.
There are a few reasons for this, but the most important one is the cooling effect that ethanol has on the incoming intake air.
This is actually one of the big advantages of using ethanol as a race fuel, cooling the intake air charge helps prevent detonation, which means we can run more boost and/or higher compression ratios.
Nonetheless, this non-linearity between theory and real world application means the ECU needs a way to correct for the difference between what should happen according to theory and what actually happens in the real world.
So when ‘Flex Fuel’ is selected as the fuel type, there is an additional ‘Fuel Scalar” table in the fuel maps. This Fuel Scalar table allows the tuner to correct the actual amount of additional fuel delivered vs the theoretical additional fuel required at specific ethanol content percentages.
The base map numbers that Haltech have in this map are a result of real world testing on a number of high performance turbo engines and for most forced induction applications they can be relied upon.
That’s the basics of flex fuel setup. Follow these steps and your engine will run the same regardless of how much ethanol you have in your fuel supply.
But wait, there’s more!
Let’s face it – you didn’t add ethanol to your engine to just run it the same as you always have. You really want to run more boost, more timing and make a bunch more horsepower when you can get your hands on this wonderful corn-burning octane of the gods.
Like with any function in the Elite series – now that the ECU knows the percentage of ethanol in the fuel you can use that data to control other functions.
Ignition Timing vs Ethanol Content
Go back to the SETUP – MAIN SETUP page and click on the IGNITION tab, notice here you can turn on a correction for “Fuel Composition Correction”. Turn this on and you get 2 new maps in the ignition maps.
There is that familiar ‘Flex Fuel Scalar’ table again and another table called the ‘Flex Fuel Correction’ table. Let’s first focus on the Flex Fuel Correction table.
This is the amount of additional timing you are adding over and above the base ignition map when you have 100% Ethanol (or more realistically E98 or even E85).
Once we have optimised this map for all load and RPM points on 100% Ethanol we don’t need to remap the entire engine at every 10% change in Ethanol content. Instead, we go into the Flex Fuel Scalar tables and map in the ignition correction Percentage vs Ethanol Content.
For example, if we had 20 degrees of ignition timing in the base ignition timing map (that is the “no ethanol” tune) and 6 degrees of timing in the “Flex Fuel Correction” map then this scalar map calculates the percentage of the additional 6 degrees of timing to add based on the % of Ethanol content in the fuel.
Boost vs Ethanol Content
Its no secret that E85 allows us to safely run more boost in an engine, so it makes sense we may want to have our target boost increased with Ethanol content, or the other way of looking at it is we can reduce the amount of boost we are making when we cannot get E85.
Setting up Boost by Ethanol content is as simple as going into the “Boost Control” function again by pressing F4, finding Boost Control, clicking on the CORRECTIONS tab and turning on the “Flex Fuel Compensation” correction.
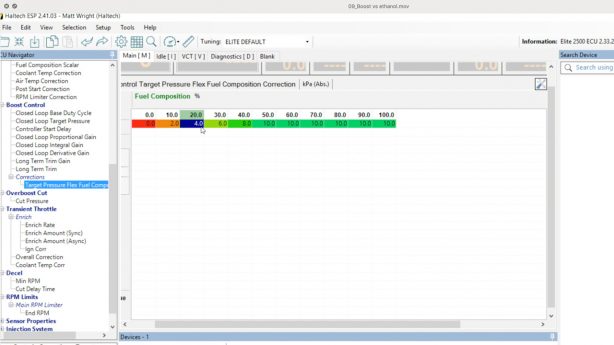
Now when we go to the Boost Control maps we have a new table under the CORRECTIONS heading of “Flex Fuel”.
This map axis is based on the percentage of Ethanol in the fuel and gives us the ability to add more boost with Ethanol content. This table adds additional boost to whatever value you have in the regular boost control target table.
Ethanol Content vs Anything
Because Haltech Elite series ECUs have flexible map axis and now the ECU knows the Ethanol content you can use this information to map any number of additional corrections.
For example, we know that engines running on E85 require more fuel on startup when they are cold.
That’s because ethanol has a higher fuel distillation temperature than gasoline, so something we might want to do is go into both Fuel Prime Pulse and Cranking Correction maps and add Flex Fuel Percentage as an axis to these maps.
Related Articles
Flex Fuel Composition/Temperature Sensor
A Flex Fuel Composition/Temperature Sensor is digital sensor used to monitor the ethanol content of the fuel as well as the fuel temperature. This can be used with your Nexus or Elite ECU for Flex Fuel tuning to suit a varying blend of ethanol in the ...Flex Fuel Composition Sensor
A Flex Fuel Composition Sensor is used to monitor the ethanol content of the fuel. This can be used with your ECU for Flex Fuel tuning to suit a varying blend of ethanol in the fuel, for datalogging, and for Engine Protection purposes. The Haltech ...Boost Control
The Boost Control function is used to regulate boost pressure by controlling the duty of a boost control solenoid. This in turn regulates the air pressure supplied to the wastegate diaphragm. Note: Due to the large number of pressure units, all ...Flex Fuel Composition/Temperature
A Flex Fuel Composition Sensor is used to monitor the ethanol content as well as the temperature of the fuel. This can be used with your ECU for Flex Fuel tuning to suit a varying blend of ethanol in the fuel, for datalogging, and for Engine ...Flex Fuel Composition Sensor
A Flex Fuel Composition Sensor is used to monitor the ethanol content of the fuel. This can be used with your Elite ECU for Flex Fuel tuning to suit a varying blend of ethanol in the fuel, for datalogging, and for Engine Protection purposes. The ...


