They see me cruisin’ – How to set up Cruise Control on your Elite ECU
Events like Drag Week in the USA and Drag Challenge here in Australia are becoming increasingly popular. Because these epic challenges involve taking street registered vehicles and driving them over vast distances for multiple days hopping from one race track to the next, features like cruise control in your aftermarket ECU are becoming more and more of a must have!
So, in this article, we look at how to setup and calibrate cruise control on a Haltech Elite 1500, 2500 or Elite Pro Plug-In series ECU.
The first thing you need to know is that for the cruise control function and work safely there are quite a few conditions that need to be met:
- Your engine must be using an electronic drive by wire throttle (Available only on Elite 1500, Elite 2500 or Elite Pro Plug in (Barra) ECUs
- You must have a vehicle speed sensor of some sort coming into the ECU (either a drivetrain sensor from the transmission directly or a wheelspeed sensor).
- You must have a brake pedal switch coming into the ECU.
- Your vehicle must have either gear detection setup, or a neutral switch wired in
- If you have a manual transmission, you must also have a clutch switch wired into the ECU
- If you have an Automatic transmission you must have a gear selector position input enabled
As you can see, there are quite a few ‘must haves’ that need to be met before cruise control can be setup. Don’t worry if you can’t remember all of these things though – one handy feature of our ESP software is that it will not allow you to setup a function to completion if all the conditions for that function haven’t been met.
For example, if you attempt to setup cruise control but forget to setup a brake pedal switch input, you will get a red error message explaining why the function cannot be enabled.

With all the background setup done, lets get on to actually setting up the cruise control functionality.
Navigate your way to the main setup page and search for cruise control. The first thing you notice is that there are three possible connections that can be made. The input selection, that is how is the ECU going to be told when to turn the cruise control on, turn off, accelerate, slow down etc. and two outputs, these are used to indicate that cruise control as a function is enabled and the other output is to indicate cruise control is actively controlling the vehicle speed.

Lets take a look at the input connection first, we have two options: CAN input or analog. We’ll tackle the CAN input first. If, for example, you have one of our Ford Falcon Elite plugin ECUs, the cruise control request information is transmitted to the ECU not through a simple voltage input, but rather by discrete messages on the vehicles onboard communication system, known as the CAN bus.
This data stream is specific to each vehicle, so if you plan on using the vehicle’s CAN input for cruise control requests, then you will need to first setup one of the ECU CAN bus systems to read that specific vehicles CAN bus. To do this click on the devices tab, in the vehicle bus dropdown select your vehicles CAN bus system and if its supported – you are good to go.

For the rest of us where there is either no factory CAN bus because we have say a 64 nova drag week car, or its simply that Haltech does not yet support your vehicles OEM CAN bus, then we need to graft in a control system that consists of a series of buttons that tells the ECU when to turn cruise control on and off.
By far the simplest way of doing this is to retrofit an OEM cruise control input to either a steering wheel or an indicator stalk, like this one.
The way these systems work is that each button on the stalk or steering wheel sends a different voltage level to the ECU then within the ECU we program each voltage level with a cruise control function such as turn on, speed up, coast down etc.
Wiring up the cruise control input switch is typically just two wires: A signal ground and an input signal wire that goes into the assigned AVI input pin on the ECU.

Because there is no defined standard or how many features a cruise control system should have you will need to match the level of functionality that your cruise control system has with Haltech’s cruise control function – to make sense of this lets go to the ESP software and look at the buttons tab, here you will see that you can have a cruise control system with up to 6 buttons.
To calibrate which button does what and the voltage provided for each function, simply select the desired functionality of the button press from the dropdown menu.. Because all systems have a “rest position” that’s always the first button to calibrate. You do so by simply not touching anything, and pressing calibrate.
Next up, calibrate the ‘enable/disable’ button press by holding down the enable disable button, and pressing calibrate. Continue on with this procedure for all of the buttons that you have in your system, select the function from the dropdown, hold that button down and press calibrate.

There is also a voltage tolerance setting which when enabled allows you to set the window in which the ECU will accept a voltage to be used as the trigger for a function. This allows for small voltage fluctuations in the system from other electrical loads that may affect the cruise control input signal. (Eg: lights, indicators or simply poor grounding). This means that when the voltage is near to, but not exactly your calibrated voltage, the system will still recognise it as a button press.
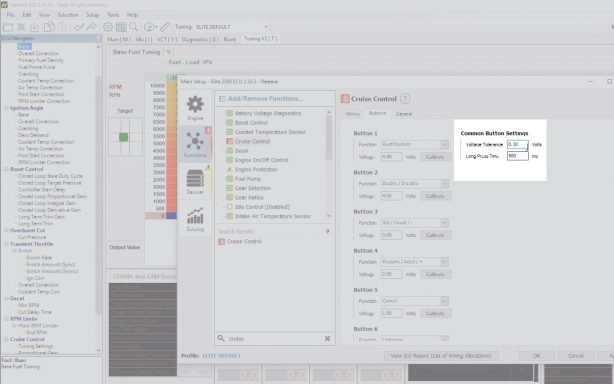
When a single button has multiple uses, (for example you may use the same button as the “accelerate” button as well as the “set” button) A long press can be configured. So when I set it up in the software I call it the set / accel / + button. A short button press activated the first function, which is set the speed and a long button press activates the second button function, which in this case is accelerate. Again on of the helpful things about ESP software is if you aren’t sure what a function or setting does, all you need to do is hover over the name of the setting and when that little question mark comes up click, and you will get a help bubble with a text description explaining what the setting does.
Once you have the system wired in and running, there is often some tuning of the system that needs to be done, which makes sense, a 200HP engine is going to respond very different to a 2000HP engine in the same vehicle.
To fine tune the cruise control we go over into the mapping tree on the left hand side of the tuning software and you will notice there is now a set of tunable maps for cruise control.
These settings allow you to set the maximum control system error value and the maximum throttle ramp in rate as well as mappable system proportion, integral and derivative gains.
While we do take time to setup and calibrate these PID settings in our base map, there are so many factors that influence the behaviour of the cruise control system some applications need these maps tweaked.
A little advice on calibrating the PID settings – Broadly speaking increasing the proportional gain will direct the control system to get to your target speed quicker,
Increasing the derivative gain will speed up the rate of change of the control system and increasing the integral gain will force the system to reduce the steady state error.
You will notice if you look at the base map settings for the proportional integral and derivative gains that the x-axis is actually based on the cruise control speed error,
As the vehicle approaches the target speed the system effectively pays less attention to the proportional and derivative gains – those are the two parameters that control how quickly and aggressively we try to hit your target speed – and more emphasis is placed on the integral gain which controls the steady state error of the system.
Thats its, thats the basics of how to wire in, setup and calibrate cruise control on your elite series ECU.
Related Articles
Initial ECU Setup
Your Elite Pro Plug-in Series ECU has been shipped in a default state. It will NOT start your vehicle without ESP configuration. Please follow the steps below to ensure you upload the correct map, set your vehicle variant and calibrate your ...How Launch Control Works
Today we’re delving into the subject of Launch Control. What it is, how it works and how it can help you win races! But before we get into the specifics of things, we need to understand the problem that we’re trying to solve. The Basics In order for ...Reasons For Selecting A Higher Spec Elite ECU
The following is a guide to why in the real world you would want to select a higher model of Elite ECU over the more basic models. It should be kept in mind that the ECU cannot be upgraded after purchasing. The correct model to choose depends on the ...Cruise Control
When active, the Cruise Control function controls the Drive By Wire Throttle in an attempt to maintain the vehicle speed at the set target speed. This function uses a single analogue input, with each button that is pressed resulting in a different ...Flick of the switch: ECU control at your fingertips
Can I control my Haltech ECU from the driver’s seat? Yes you can! You can now control your Elite functions in real time from inside the cabin using the Haltech Trim Module. Torque management, boost levels, nitrous control, ignition correction and ...